Most "getting started" guides skip the part where you actually get started. They spend 600 words on history, throw a wall of model specs at you, then end with "happy prompting!" — and you're still staring at a blank input box. Not this one. By the end of this guide you'll have Gemini 3.1 running a real prompt, either in your browser or via API, with the right model picked for your use case. I've been testing all three models since the March 3, 2026 launch — here's what you actually need to know.
What Is Gemini 3.1?

Gemini 3.1 is the latest generation of Google's AI model family, launched on March 3, 2026. It's not one model — it's three, each designed for a different job. All of them run on the same foundation of state-of-the-art multimodal reasoning, handling text, images, audio, video, and code.
What's new in 3.1 versus earlier Gemini versions? Three things worth caring about: better reasoning depth, a new thinking_level parameter that lets you control how hard the model thinks (and how much it costs), and significantly improved agentic capabilities — meaning it can plan and execute multi-step tasks, not just answer single questions.
All Gemini 3.1 models are currently in preview. Production apps that were using Gemini 3 Pro Preview need to migrate — Google deprecated that model on March 9, 2026.
Flash-Lite vs Flash vs Pro — Which One to Use
Here's the decision table I wish existed when I started:
| Model | Model String | Best For | Input Price | Output Price | Context Window |
|---|---|---|---|---|---|
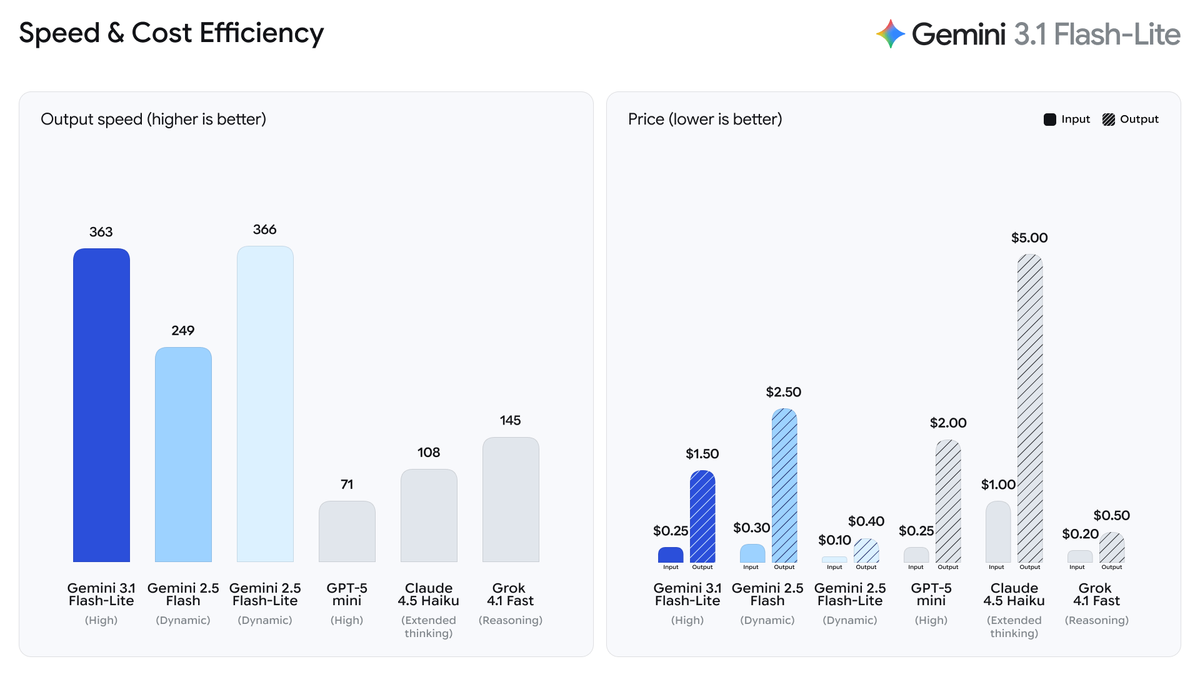
| Gemini 3.1 Flash-Lite | gemini-3.1-flash-lite-preview | Translation, moderation, high-volume tasks | $0.25/1M | $1.50/1M | 1M tokens |
| Gemini 3 Flash | gemini-3-flash-preview | Balanced tasks, agentic workflows, prototyping | ~$0.30/1M | ~$2.50/1M | 1M tokens |
| Gemini 3.1 Pro | gemini-3.1-pro-preview | Complex reasoning, coding, research synthesis | $2.00/1M | $18.00/1M | 1M tokens |
The honest rule of thumb: start with Flash-Lite if you're doing repetitive or high-volume work. Use Flash if you're prototyping something that needs a bit more reasoning. Reach for Pro only when the task genuinely needs it — it's roughly 12x more expensive than Flash-Lite on output tokens.
One thing that tripped me up: Flash and Flash-Lite both have free tiers in the Gemini API. Pro does not have a free API tier, but you can test it for free inside Google AI Studio.
How to Use Gemini 3.1 in Google AI Studio
Google AI Studio is the fastest way to try Gemini 3.1 without writing a line of code. No billing setup, no SDK install — just a browser.
Step 1: Sign In
Go to aistudio.google.com. Sign in with any Google account. That's it. New users get a default Google Cloud project and API key created automatically on first login.
One note: if you already have a Google Cloud account, you won't get a default project auto-created. You'll need to import one via the Projects view in the dashboard.
Step 2: Select Your Model
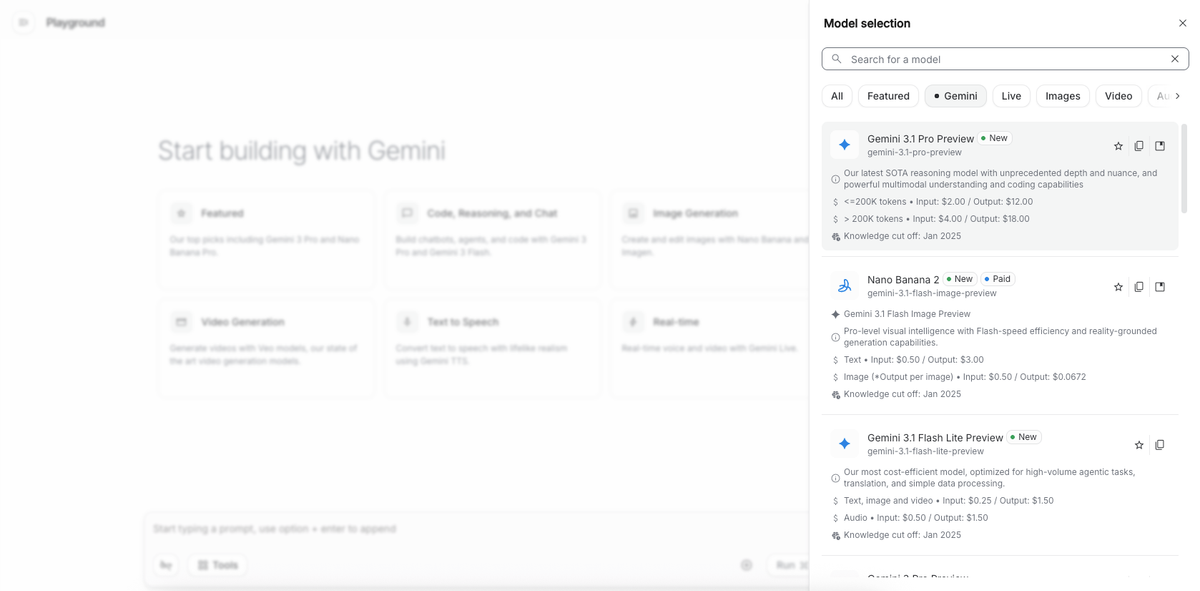
Once you're in, click Create new prompt (or open an existing one). In the top-right panel, you'll see a model selector dropdown. As of March 2026, the available Gemini 3 series options are:
Gemini 3.1 Pro PreviewGemini 3 Flash PreviewGemini 3.1 Flash-Lite Preview
Select the one that fits your use case using the table above. If you're just exploring, start with Gemini 3 Flash — it's free in AI Studio and handles most general tasks well.
You'll also see a Thinking toggle and a thinking level selector (minimal / low / medium / high). For quick tests, leave it on the default. For tasks that involve logic or multi-step reasoning, bump it up to medium or high and watch the difference.
Step 3: Run Your First Prompt
Type your prompt in the message box and hit Run. Here are three prompts worth testing to get a feel for the model's range:
Simple text task:
Summarize the key differences between REST and GraphQL APIs in three bullet points.Reasoning task (good for comparing thinking levels):
A pipeline processes 10,000 requests per hour. Each request costs $0.003 to process.
If we reduce processing cost by 40%, how much do we save per day? Show your work.
Multimodal task (upload an image first using the paperclip icon):
Describe what's happening in this image and suggest three ways to improve it.You'll see the response stream in real time. In the top-right corner, AI Studio shows you token usage and estimated cost — useful for calibrating which model tier actually makes sense for your workload before you commit to API calls.
How to Use Gemini 3.1 via API
If you're building something — even a quick script — the API is the right path. Here's the minimal setup.
Get Your API Key
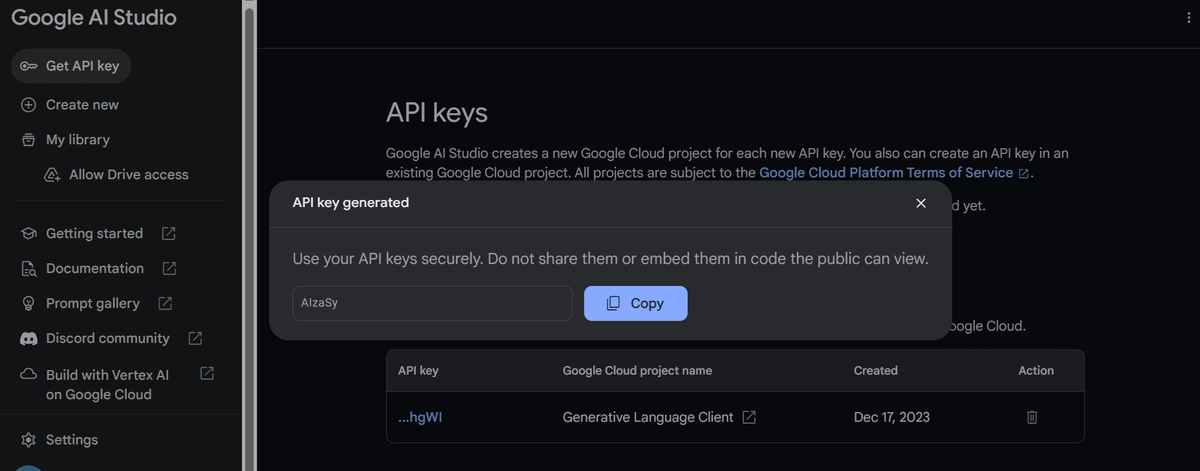
Head to aistudio.google.com/app/apikey. Click Create API key, select your project, and copy the key. Set it as an environment variable so you don't hardcode it anywhere:
# macOS / Linux
export GEMINI_API_KEY="your-key-here"

# Windows (Command Prompt)
set GEMINI_API_KEY=your-key-here
The Gemini API key documentation recommends always using environment variables — never hardcoding keys in source files, especially anything going to version control.
Make Your First Call
Install the SDK. You need Python 3.9+:
pip install -q -U google-genaiThen make your first call. This example uses Flash-Lite, which has a free tier and is fast enough that you'll see results in a couple of seconds:
from google import genai

# Client picks up GEMINI_API_KEY from environment automatically
client = genai.Client()

response = client.models.generate_content(
    model="gemini-3.1-flash-lite-preview",
    contents="Explain the difference between synchronous and asynchronous programming in plain English.",
)

print(response.text)
Want to use Pro instead? Swap the model string:
response = client.models.generate_content(
    model="gemini-3.1-pro-preview",
    contents="Analyze the architectural trade-offs between microservices and a monolith for a team of 5 engineers.",
)
Want to control thinking depth? Add the thinking_config parameter — useful when you're optimizing for cost vs. quality on a specific task:
from google import genai
from google.genai import types

client = genai.Client()

# High thinking — for complex reasoning
response = client.models.generate_content(
    model="gemini-3.1-flash-lite-preview",
    contents="Design a database schema for a multi-tenant SaaS app with role-based access control.",
    config=types.GenerateContentConfig(
        thinking_config=types.ThinkingConfig(thinking_level="high")
    ),
)

print(response.text)
The full reference for available parameters — including streaming, function calling, and context caching — lives in the Gemini API reference docs. If you're working in JavaScript, Go, or Java, the SDK libraries page has install commands and equivalent code samples for each language.
Quick note on the Batch API: If you're running non-time-sensitive workloads at scale (think: processing thousands of documents overnight), the Batch API gives you 50% off standard pricing with a 24-hour turnaround target. Worth knowing before you architect anything high-volume.
Which Method Is Right for You?
No hedging — here's a direct answer:
| If you... | Use this |
|---|---|
| Want to test a prompt quickly with no setup | Google AI Studio |
| Are building an application or script | Gemini API |
| Need Pro but want to test free before billing | AI Studio first, then API |
| Are running high-volume / batch workloads | API + Batch API |
| Work in an enterprise with compliance requirements | Vertex AI (contact Google Cloud) |
One practical workflow I've settled into: prototype in AI Studio with the Thinking panel open so I can see how the model reasons, tweak the prompt until the output is right, then move to the API with the exact model string and thinking level I've validated. Skips a lot of trial-and-error on the code side.
The Gemini API quickstart is genuinely good if you want to go deeper after this — it covers streaming, multimodal inputs, and function calling with clean code examples. That's the next logical step once you've got the basics running.
You might also find these useful:
What Is Gemini 3.1 Flash-Lite? A Plain-English Guide
