You ran the install command, it succeeded, and then Grok Build wouldn't let you in. That's the most common Grok Build setup snag, and it's not a bug — beta access is tied to a specific xAI subscription, not to having an API key or an X account. Before you spend time debugging your shell, the first thing to verify is account access. This guide covers the full install path for macOS, Linux, WSL, and Windows, plus the auth, TUI, and headless setup that actually gets you to a working session.
Based on xAI's documentation current at May 26, 2026. Grok Build is in early beta — install commands, access requirements, and features change frequently. Verify against the official xAI docs before relying on any specific step.
What You Need Before Installing Grok Build
Account access and beta status
Grok Build is in early beta. Access is limited to specific xAI subscription tiers — reporting at launch indicated SuperGrok Heavy subscribers, with Windows installer coverage citing SuperGrok and X Premium+ subscribers. The key point: beta access is tied to your subscription, not to a plain xAI API key or a basic X account.
This is the source of the most common "I installed it but can't use it" problem. The install succeeds regardless of your subscription; the authentication step is where access is gated. Confirm your account holds an eligible subscription before installing, and sign in during first launch with that account. Verify current eligibility requirements at the official xAI docs, as beta access tiers may change.
macOS, Linux, WSL, and Windows support
Support status as of late May 2026, which requires careful reading because it changed mid-month:
- macOS: natively supported
- Linux: natively supported
- Windows via WSL2: supported — the documented path for Windows developers for most of the beta
- Windows PowerShell: xAI released a PowerShell installer on May 25, 2026
The Windows situation is genuinely transitional. For most of the beta, the documented Windows path was WSL2 (with some commands reportedly behaving inconsistently even there). The May 25 PowerShell installer added a more direct Windows path. If you're on Windows, both options exist now — but as an early beta addition, the PowerShell path may have rough edges that the more established macOS/Linux/WSL paths don't. A fully mature native Win32 build was still described as on the roadmap without a committed date.
"Grok Build app" is a slight misnomer worth clearing up: Grok Build is a command-line tool (CLI) with an interactive terminal UI (TUI), not a standalone desktop GUI application. You run it in your terminal, not from an applications folder.
Install Grok Build from the CLI
macOS, Linux, and WSL install path
The install is a single command:
curl -fsSL https://x.ai/cli/install.sh | bashThis downloads and runs the install script. On WSL2, run this inside your WSL Linux environment (not in Windows CMD or PowerShell) — WSL2 is a Linux environment, so the Linux install path applies.
After install, verify:
grok --versionIf grok isn't found, the install location isn't on your PATH. See the troubleshooting section below.
Windows PowerShell install path
As of May 25, 2026, Windows users have a native PowerShell installer:
irm https://x.ai/cli/install.ps1 | iexThis downloads and runs the PowerShell install script. Run it in a PowerShell session (not CMD). Because this is a recent beta addition, verify the current command at the official docs — early installer commands sometimes change in the first weeks after release.
For Windows developers who were already using the WSL2 path, there's no urgent need to switch to PowerShell — the WSL2 path remains functional. The PowerShell installer is most relevant for Windows developers who prefer not to use WSL.
First launch and browser authentication
On first launch, Grok Build opens a browser window for OAuth authentication (per the getting-started docs):
cd your-project
grok
Sign in with the account that holds your eligible xAI subscription. This is the step where beta access is enforced — if your account doesn't hold an eligible subscription, authentication won't grant access regardless of a successful install. The browser-based OAuth flow is the default for workstation use; for headless environments, see the API key path below.
Start Your First Grok Build Session
Run Grok Build inside a repo
Grok Build operates on the repository in your current working directory. Change into your project before launching:
cd ~/projects/my-app
grok
A good first action is to confirm the agent picked up your repository context. Run the inspect command to see what Grok detected:
grok inspectThis shows config sources, instructions, skills, plugins, hooks, and MCP servers that Grok loaded for the current directory. It's the fastest way to confirm your AGENTS.md and any MCP servers were actually loaded before you trust the agent with a real change.
Use the TUI for interactive coding
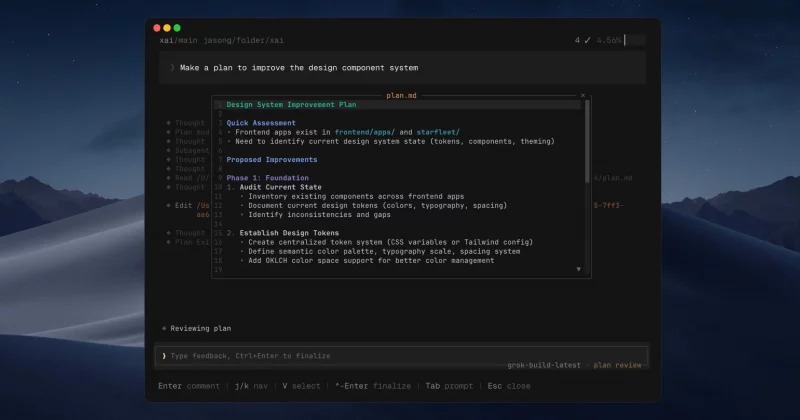
The default interactive mode is a terminal UI (TUI) — a structured back-and-forth session in your terminal. You type a high-level objective, and Grok Build responds with a plan and proposed actions.
Grok Build's Plan Mode is the feature xAI emphasizes most. Instead of a linear text plan, it generates a graph of sub-tasks with per-node state displayed in the TUI, and can activate parallel sub-agents on independent branches. You describe an objective ("add rate limiting to the Express middleware with Redis"), Grok builds a structured plan with files to touch and commands to run, and you approve before execution.
Switch models inside the TUI with /model <name>.
Try headless mode for scripts and automation
For non-interactive use — CI pipelines, cron jobs, scripts — Grok Build supports headless mode via the -p flag:
grok -p "add integration tests for the auth module"Headless mode runs the agent without the interactive TUI, suitable for automated pipelines. Grok Build also supports the ACP (Agent Client Protocol) for deeper automation integration. In headless environments, you'll use API key authentication rather than browser OAuth (covered next).
Configure Grok Build for Developer Workflows
API key authentication in non-browser environments
Browser sign-in works on a workstation but breaks on a headless server, a CI runner, or a remote container with no browser. For those environments, set an environment variable with an xAI API key:
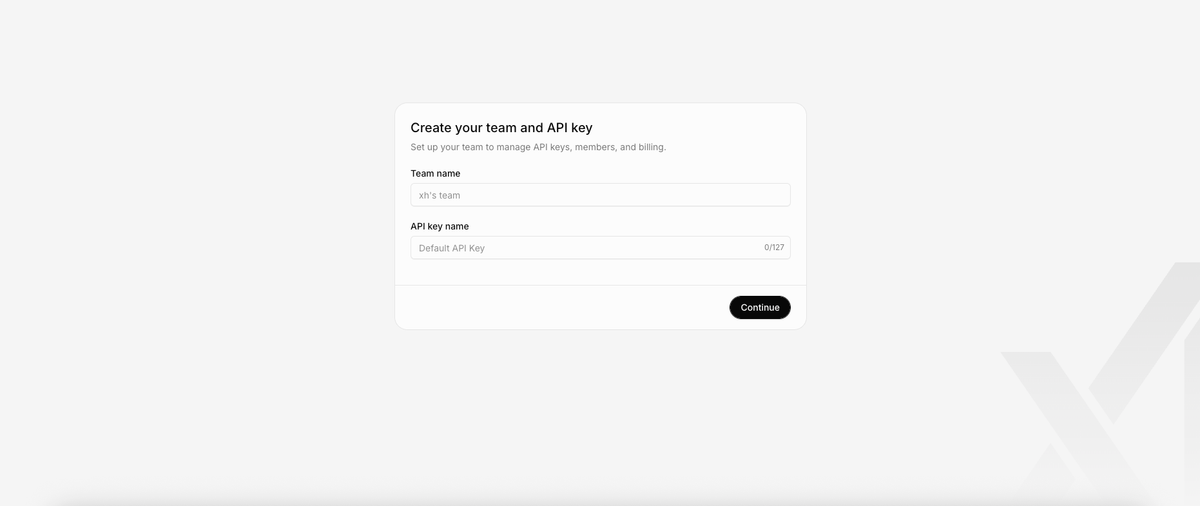
export GROK_CODE_XAI_API_KEY="xai-..."Create the key at console.x.ai (API Keys → Create API Key). Inject it from a secrets store in CI; never commit it to your repository. With the environment variable set, Grok Build authenticates without opening a browser, making headless and automated use possible.
Custom models and config discovery
Grok Build runs on grok-build-0.1 by default — a coding-specific model with a 256K-token context window, accepting text and image input (model reference). (Note: earlier launch-week coverage citing grok-code-fast-1, now deprecated, or a "2M-token context" is out of date — verify the current model at docs.x.ai.)
Grok Build supports model flexibility, including routing through OpenRouter to use Claude, GPT, or local LLMs through the same CLI. Configure the model in headless mode via flags or in the TUI via /model <name>. Run grok inspect to confirm which config sources and model settings were discovered for the current directory.
AGENTS.md, skills, hooks, and MCP servers
Grok Build automatically discovers and loads standard agent configuration:
- AGENTS.md and CLAUDE.md: Grok Build recognizes both. If you're migrating from Claude Code, your CLAUDE.md works without changes.
- Skills: Grok recognizes the Anthropic skill format. Copy the skills folder into the project directory or into
~/.grok/skills/and the CLI loads them automatically. - MCP servers: Already-configured MCP servers are picked up automatically.
- Hooks and plugins: Discovered and loaded from standard locations.
This zero-migration compatibility with Claude Code's configuration format is a deliberate design choice — it lowers the switching cost for developers coming from Claude Code. Run grok inspect after configuring to confirm everything loaded.
Common Setup Problems
Shell and PATH issues
grok: command not found after install: The install location isn't on your PATH. The install script reports where it placed the binary — add that directory to your PATH in your shell profile (.bashrc, .zshrc, or equivalent), then restart your shell or source the profile. Verify with which grok (macOS/Linux/WSL).
Install script fails partway: Check that curl is installed and you have network access to x.ai. On a restricted network, the install script's download step may be blocked.
Windows and WSL confusion
Running the Linux install command in PowerShell: The curl ... | bash command is for macOS/Linux/WSL. In PowerShell, use the PowerShell installer (irm https://x.ai/cli/install.ps1 | iex) instead. Mixing them up is a common Windows error.
WSL vs Windows-native confusion: If you installed via WSL2, run grok inside your WSL Linux session, not in Windows CMD/PowerShell. The WSL install and the PowerShell install are separate — a binary installed in WSL isn't available in native Windows PowerShell and vice versa. Pick one path and use it consistently.
Commands behaving inconsistently in WSL: Some commands have been reported to behave inconsistently under WSL during the beta. If you hit unexpected behavior in WSL and you're on Windows, the PowerShell installer is now an alternative to try.
Auth or account access problems
"Installed but can't access": This is almost always the subscription gate. The install succeeds for anyone; access requires an eligible xAI subscription tied to the account you authenticate with. Confirm your account holds an eligible tier and that you're signing in with that exact account during the OAuth flow.
Browser doesn't open / headless environment: Use the GROK_CODE_XAI_API_KEY environment variable path instead of browser OAuth. The browser flow only works where a browser is available.
Beta Limits and Safety Checks
Treat early beta behavior as unstable
Grok Build is early beta. Install commands, model names, access requirements, and features have changed within the beta period and will likely change again. Don't build a production-critical workflow on top of beta behavior that could shift. For experimentation and evaluation, it's fine; for anything you depend on, wait for more stability or keep a more established tool (Claude Code, Codex CLI) as your production path.
Review diffs before accepting changes
This applies to any coding agent and doubly to a beta one: review every diff before accepting it. Plan Mode's approve-before-execute flow helps — you see the plan before the agent acts — but the plan approval is not a substitute for reviewing the actual code changes. Read the diff, confirm it does what you intended, and don't accept changes you haven't reviewed.
Avoid running unclear commands without approval
Grok Build can run terminal commands as part of its agent loop. In a beta tool, be conservative about what you let it run unattended. Use the approval gates, don't run it in --yolo-style auto-approve modes on a repository or system you care about, and be especially cautious with commands that modify state outside the repository (package installs, system changes, anything touching credentials or deployment). The plan-and-approve workflow exists for exactly this reason — use it.
FAQ
What is Grok Build CLI?
Grok Build is xAI's terminal-native AI coding agent — a command-line tool (CLI) with an interactive terminal UI (TUI), launched in beta in May 2026. It embeds xAI's Grok models (default: grok-build-0.1) directly in your terminal, with Plan Mode (graph-based task planning with approval gates), parallel sub-agents, headless mode for automation, and compatibility with AGENTS.md, CLAUDE.md, Anthropic-format skills, and MCP servers. It competes with Claude Code and Codex CLI in the terminal coding agent category. It's a CLI/TUI tool, not a standalone desktop GUI app.
How do I install Grok Build on Windows?
Two options as of late May 2026. The PowerShell installer (released May 25, 2026): run irm https://x.ai/cli/install.ps1 | iex in a PowerShell session. Or via WSL2: install Windows Subsystem for Linux 2, then run the Linux install command (curl -fsSL https://x.ai/cli/install.sh | bash) inside your WSL environment. The PowerShell path is newer and may have beta rough edges; the WSL2 path was the documented standard for most of the beta. Verify the current Windows install instructions at the official xAI docs, as the Windows story is actively evolving.
Does Grok Build work in WSL?
Yes. WSL2 (Windows Subsystem for Linux 2) was the documented Windows path for most of the beta — install it inside your WSL Linux environment using the Linux install command, and run grok inside the WSL session. Some commands have been reported to behave inconsistently under WSL during the beta. If you encounter issues, the native PowerShell installer (released May 25, 2026) is an alternative to try. Verify current WSL support status at the official docs.
Why can't I access Grok Build after installing it?
Almost always the subscription gate. The install succeeds for anyone, but access requires an eligible xAI subscription (reporting at launch cited SuperGrok Heavy; Windows coverage cited SuperGrok and X Premium+). Beta access is tied to the subscription on the account you authenticate with during the browser OAuth flow — not to having an API key or a basic X account. Confirm your account holds an eligible subscription and that you're signing in with that exact account. Verify current access requirements at the official xAI documentation, as beta eligibility can change.
When should developers use Grok Build instead of another coding agent?
Consider Grok Build if you want to evaluate xAI's Grok models in a terminal workflow, you value Plan Mode's graph-based planning with parallel sub-agents, or you're already in the xAI/SuperGrok ecosystem. Its zero-migration compatibility with Claude Code's config format (CLAUDE.md, skills, MCP) makes it low-friction to try alongside Claude Code. Stay on a more established tool (Claude Code, Codex CLI) for production-critical work until Grok Build reaches GA — it's early beta. Note that Grok Build, like Claude Code and Codex CLI, is a terminal coding agent; tools like Verdent operate at a different layer, focused on Plan-First multi-agent workflows with Git worktree isolation and reviewable diffs across parallel tasks. The terminal agent and the workflow platform address different parts of the stack.
Related Reading
