Olha, estou configurando ferramentas de IA há anos, e o OpenClaw é genuinamente uma das instalações mais limpas que já vi — mas "limpa" não significa "óbvia." Na primeira vez que passei por ela, travei em problemas de PATH, fiquei 20 minutos me perguntando por que minha lista de modelos estava vazia, e de alguma forma acabei com um gateway que não estava devidamente bloqueado.
Então voltei, passei por tudo do zero, documentei cada ponto de fricção, e esse é o guia que eu gostaria de ter tido.
Resumo honesto de cara: a configuração do OpenClaw leva 10–15 minutos se você tem Node.js >=22 e uma API key prontas. Se você está começando do zero, preveja 25–30 minutos. De qualquer forma, ao final você terá um parceiro de desenvolvimento com IA rodando conectado ao Claude, GPT, ou um roteador multi-provider — e opcionalmente acessível pelo WhatsApp, Telegram, Discord, Slack, Lark ou iMessage.
Vamos nessa.
O que você precisa antes de começar?
Antes de rodar um único comando, verifique essas três coisas:
Node.js >= 22. Roda node --version no seu terminal. Se você receber v22.x.x ou superior, tudo certo. Se receber algo menor — ou "command not found" — você precisa instalar primeiro.
# macOS (Homebrew — opção mais rápida se você já tem)
brew install node

# macOS ou Linux via fnm (gerenciador de versão, altamente recomendado)
curl -fsSL https://fnm.vercel.app/install | bash && fnm install 22

# Ou só pega o instalador em https://nodejs.org
npm vem junto com o Node.js, então esse já está resolvido automaticamente.
Um SO suportado. O OpenClaw roda em macOS, Linux e Windows via WSL2. Windows nativo (sem WSL2) não é suportado.
Checagem rápida de realidade — se você está no Windows sem WSL2 configurado, para e faz isso primeiro. A documentação oficial da Microsoft sobre instalação do WSL2 cobre bem e leva uns 10 minutos.
Como instalar o OpenClaw?
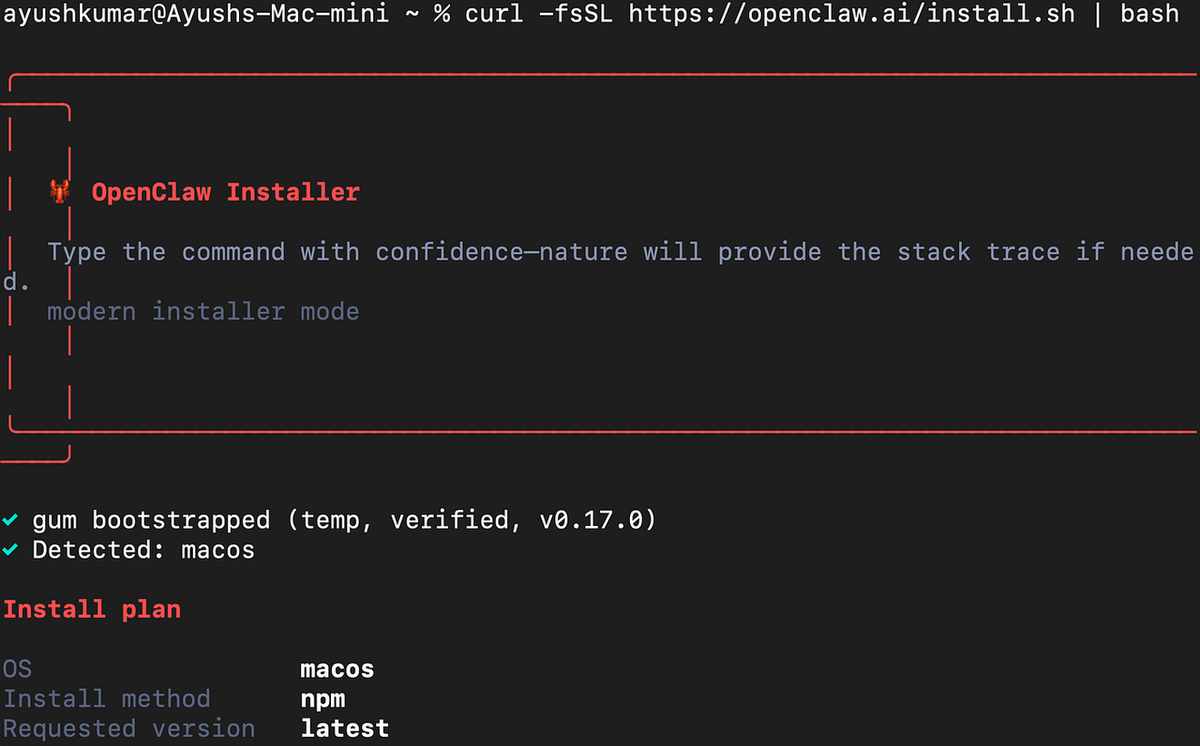
Um comando:
npm install -g openclaw@latestDepois verifica se instalou:
openclaw --versionSe você receber um erro de permissão na instalação: tenta prefixar com sudo. Isso é uma questão de macOS/Linux onde o diretório global do npm precisa de acesso elevado.
Se openclaw** não for encontrado** depois da instalação (isso me pegou): o npm coloca binários globais em algum lugar que pode não estar no seu PATH. Corrige assim:
export PATH="$(npm config get prefix)/bin:$PATH"Adiciona essa linha ao seu ~/.zshrc ou ~/.bashrc pra tornar permanente.
Qual provider de IA escolher?
O OpenClaw suporta múltiplos providers de IA. Aqui está o breakdown prático:
| Provider | Melhor pra | Formato da API key | Modelo de custo |
|---|---|---|---|
| Anthropic | Modelos Claude — melhor raciocínio geral (recomendado) | sk-ant-... | Pay-per-use |
| OpenAI | Modelos GPT — forte em codificação e seguimento de instruções | sk-... | Pay-per-use |
| OpenRouter | Acesso a Claude, GPT, Gemini + 100+ modelos com uma key | sk-or-... | Pay-per-use |
Minha recomendação honesta: começa com Anthropic se você vai usar isso principalmente pra trabalho de desenvolvimento. O Claude Sonnet 4.6 atinge um equilíbrio muito bom de capacidade e custo pro tipo de tarefas pras quais o OpenClaw foi construído — raciocínio de contexto longo, codificação multi-etapa, code review.
O OpenRouter vale considerar se você quer flexibilidade pra trocar de modelos sem gerenciar múltiplas API keys. O trade-off é uma camada de roteamento fina entre você e o provider.
Como obter sua API key passo a passo?
Uma API key é essencialmente uma senha que deixa o OpenClaw autenticar suas requisições pro provider de IA. Cada provider tem seu próprio dashboard. Aqui está exatamente como obter a sua.
Anthropic (Claude)
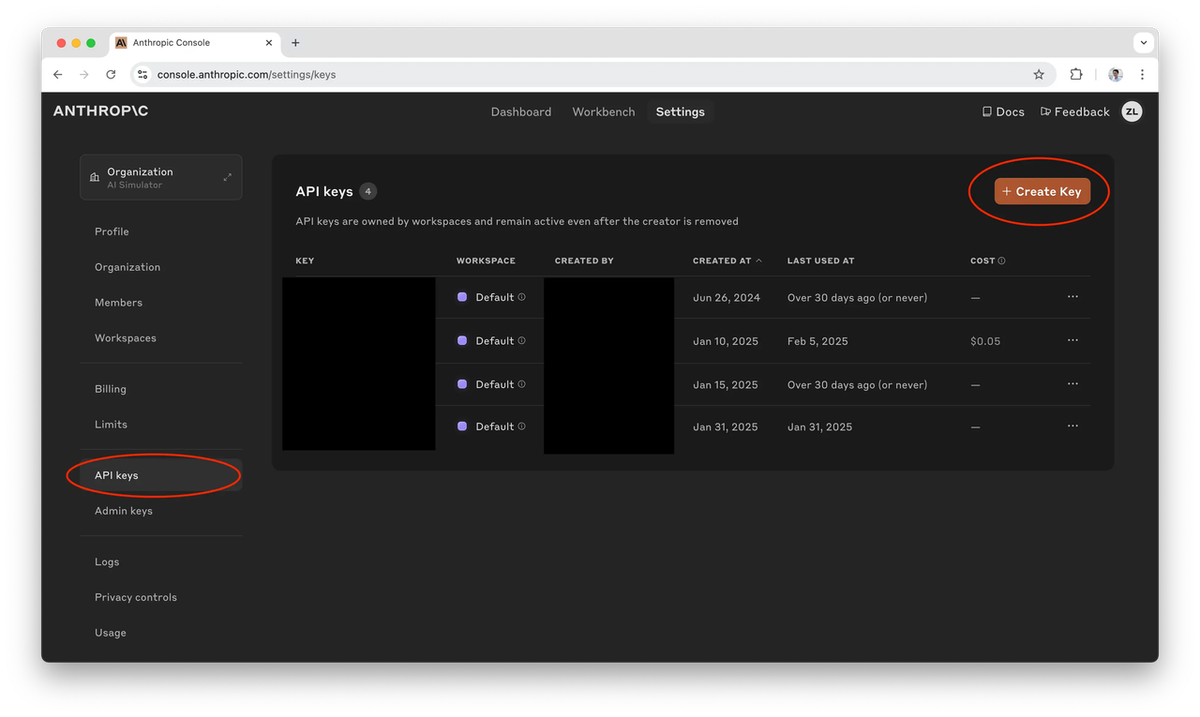
- Vai em console.anthropic.com e cria uma conta ou faz login
- Navega pra Settings → API Keys (link direto: console.anthropic.com/settings/keys)
- Clica em Create Key, dá um nome como "openclaw"
- Copia a key imediatamente — começa com
sk-ant-e você não conseguirá vê-la novamente - Novas contas precisam adicionar um método de pagamento em Billing antes de a key funcionar de verdade
OpenAI (GPT)
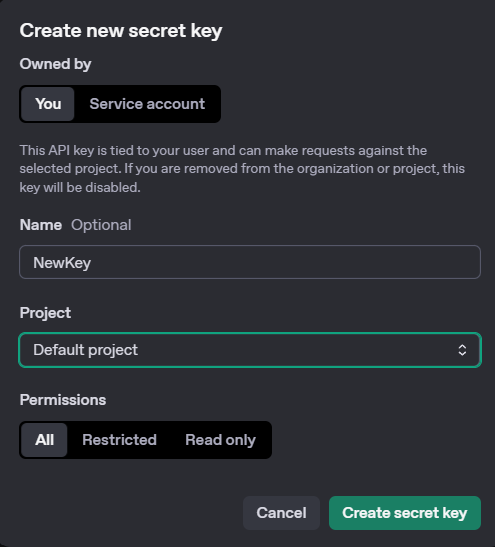
- Vai em platform.openai.com/api-keys
- Clica em Create new secret key, nomeia como "openclaw"
- Copia imediatamente (começa com
sk-) — mesma situação, mostrada só uma vez - Se você ainda não adicionou billing: platform.openai.com/settings/organization/billing
OpenRouter (Multi-Provider)
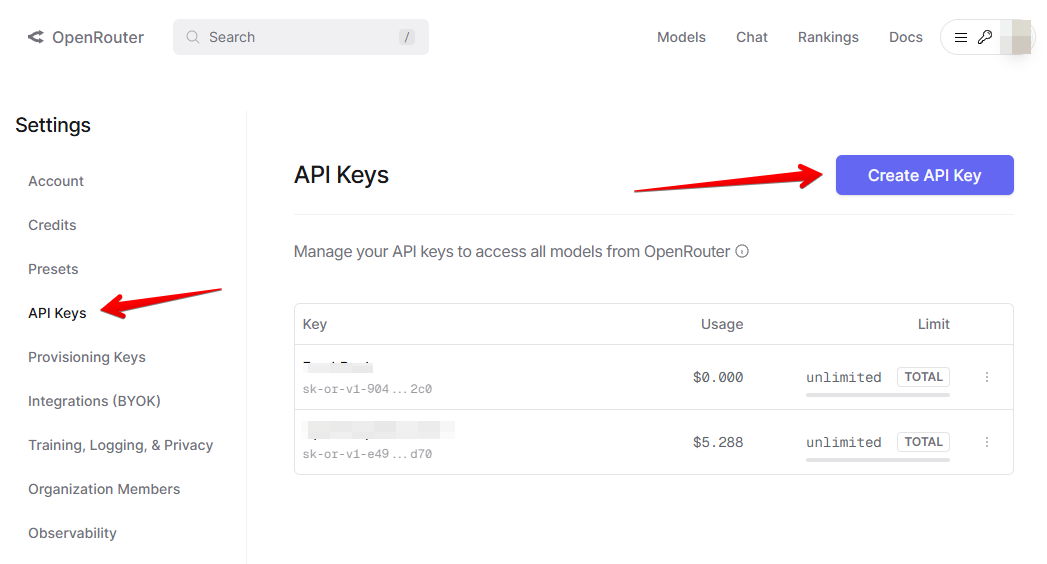
- Vai em openrouter.ai/keys
- Clica em Create Key, nomeia como "openclaw"
- Copia a key (começa com
sk-or-) - Adiciona créditos em openrouter.ai/credits se necessário
Ainda não tem uma key? Tudo bem — você pode pular a key durante o onboarding e adicioná-la manualmente ao ~/.openclaw/openclaw.json depois. Vai pra seção de Exemplo de Configuração Completa pra ver o formato.Como rodar a configuração inicial?
O comando onboard do OpenClaw faz todo o trabalho pesado. Substitui o placeholder pela sua key real.
Se você está usando Anthropic:
openclaw onboard --install-daemon --anthropic-api-key "sk-ant-your-key-here"Se você está usando OpenAI:
openclaw onboard --install-daemon --openai-api-key "sk-your-key-here"Se você está usando OpenRouter:
openclaw onboard --install-daemon --auth-choice apiKey --token-provider openrouter --token "sk-or-your-key-here"Esse único comando faz quatro coisas:
- Configura autenticação com seu provider escolhido
- Sobe o gateway local na porta 18789
- Instala e inicia o daemon em background
- Roda um health check pra confirmar que tudo está vivo
Se o comando não-interativo falhar (isso acontece às vezes com certas configurações de shell): roda openclaw onboard --install-daemon sem as flags de key e segue os prompts interativos. Seleciona seu provider, cola sua key quando pedido, e aceita os defaults pra todo o resto.
Como escolher seu modelo padrão?
Seu modelo padrão é o que o OpenClaw usa em novas conversas. Define editando ~/.openclaw/openclaw.json.
Modelos Anthropic
{
  "agents": {
    "defaults": {
      "model": { "primary": "anthropic/claude-sonnet-4-6" }
    }
  }
}| Modelo | Config ID | Quando usar |
|---|---|---|
| Claude Sonnet 4.6 | anthropic/claude-sonnet-4-6 | Melhor equilíbrio de velocidade, custo e capacidade — começa aqui |
| Claude Opus 4.6 | anthropic/claude-opus-4-6 | Tarefas de raciocínio pesado onde você precisa do melhor output |
| Claude Haiku 4.5 | anthropic/claude-haiku-4-5-20251001 | Respostas rápidas, baixo custo — bom pra queries simples |
Nota sobre versões: IDs de modelos podem mudar quando providers lançam atualizações. Se um model ID parar de funcionar, verifica a documentação de modelos da Anthropic pra lista atualizada.
Modelos OpenAI
{
  "agents": {
    "defaults": {
      "model": { "primary": "openai/gpt-5.2" }
    }
  }
}| Modelo | Config ID | Notas |
|---|---|---|
| GPT-5.2 | openai/gpt-5.2 | Default recomendado |
| GPT-5.2 mini | openai/gpt-5.2-mini | Mais rápido e barato |
| o3 | openai/o3 | Raciocínio multi-etapa forte |
Modelos OpenRouter
O OpenRouter usa o formato openrouter/<provider>/<model>:
{
  "agents": {
    "defaults": {
      "model": { "primary": "openrouter/anthropic/claude-sonnet-4-6" }
    }
  }
}| Modelo | Config ID |
|---|---|
| Claude Sonnet 4.6 | openrouter/anthropic/claude-sonnet-4-6 |
| Claude Opus 4.6 | openrouter/anthropic/claude-opus-4-6 |
| GPT-5.2 | openrouter/openai/gpt-5.2 |
| Gemini 2.5 Pro | openrouter/google/gemini-2.5-pro |
Quais configurações recomendadas adicionar?
Essas não são defaults — você precisa adicioná-las manualmente. Mas fazem diferença real no uso diário.
{
  "agents": {
    "defaults": {
      "compaction": { "mode": "safeguard" },
      "maxConcurrent": 4,
      "subagents": { "maxConcurrent": 8 }
    }
  },
  "messages": { "ackReactionScope": "group-mentions" },
  "commands": { "native": "auto", "nativeSkills": "auto" },
  "skills": { "install": { "nodeManager": "npm" } }
}
O que cada uma faz de verdade:
compaction: safeguard— impede o agente de perder contexto quando conversas ficam longas. Sem isso, você pode ter falhas silenciosas em tarefas complexas.maxConcurrent: 4— limita quantas tarefas rodam ao mesmo tempo. Aumenta se você faz muito trabalho paralelo; diminui se está numa máquina com recursos limitados.ackReactionScope: group-mentions— em chats de grupo, o bot só reage a mensagens que o mencionam. Evita ruído em canais compartilhados.
Como proteger sua instalação do OpenClaw?
Essa é a seção que a maioria das pessoas pula. Não pula.
O wizard de onboarding já deve ter configurado isso, mas verifica se seu ~/.openclaw/openclaw.json tem:
{
  "gateway": {
    "mode": "local",
    "bind": "loopback",
    "auth": { "mode": "token" },
    "nodes": {
      "denyCommands": [
        "camera.snap", "camera.clip", "screen.record",
        "calendar.add", "contacts.add", "reminders.add"
      ]
    }
  }
}
Três regras inegociáveis:
- Sempre usa bind em loopback.
"bind": "loopback"significa que o gateway só escuta em127.0.0.1— sua própria máquina. Se isso for alterado pra0.0.0.0, seu gateway fica exposto pra toda a sua rede. Não faz isso. - Mantém autenticação por token. O token de autenticação do gateway é essencialmente uma senha.
"auth": { "mode": "token" }garante que toda requisição precise se autenticar. Desligar isso significa que qualquer coisa na sua máquina pode falar com seu agente de IA. - Usa a lista denyCommands. É aqui que você bloqueia explicitamente o agente de acessar sua câmera, calendário e contatos sem permissão manual. A lista acima é uma boa baseline — adiciona qualquer outra coisa com a qual você não está confortável que o agente toque.
Checagem rápida de realidade: o modelo de segurança é "local por padrão, opt-in explícito pra tudo sensível." É um design razoável. Só garante que os defaults estejam realmente em vigor.
Como conectar apps de mensagens? (Opcional)
Você pode usar o OpenClaw inteiramente pelo terminal (openclaw tui) e isso é genuinamente ótimo pra maioria dos workflows de desenvolvimento. Mas conectar um app de mensagens significa que você pode interagir com seu parceiro de desenvolvimento com IA pelo celular, o que é ocasionalmente muito útil.
Aqui está a configuração de cada canal — começa pelo que você realmente usa.
Como conectar o WhatsApp?
O WhatsApp faz par via scan de QR code, igual ao WhatsApp Web.
Passo 1 — Adiciona config:
{
  "channels": {
    "whatsapp": {
      "enabled": true,
      "dmPolicy": "pairing",
      "allowFrom": ["+seu-numero-aqui"],
      "groupPolicy": "allowlist",
      "groupAllowFrom": ["+seu-numero-aqui"]
    }
  }
}
Substitui +seu-numero-aqui pelo seu número em formato internacional (ex: +5511999991234).
Passo 2 — Vincula seu celular:
openclaw daemon restart
openclaw channels login --channel whatsapp
Passo 3 — Escaneia o QR code no WhatsApp: Configurações → Aparelhos Conectados → Conectar Aparelho.
Passo 4 — Aprova o par:
openclaw pairing list whatsapp
openclaw pairing approve whatsapp <CÓDIGO>
Melhor prática: usa um número de WhatsApp dedicado, não o seu pessoal. A conexão funciona via o mesmo protocolo multi-device do WhatsApp Web — é uma sessão de aparelho vinculado.
Como conectar o Telegram?
Esse é o mais rápido. Você só precisa de um bot token do BotFather.
Passo 1 — Cria o bot:
- Abre o Telegram e manda mensagem pro @BotFather
- Envia
/newbote segue os prompts - Copia o token que o BotFather te dá
Passo 2 — Adiciona config:
{
  "channels": {
    "telegram": {
      "enabled": true,
      "botToken": "seu-bot-token-aqui",
      "dmPolicy": "pairing"
    }
  }
}
Passo 3 — Reinicia e aprova:
openclaw daemon restartManda qualquer mensagem pro seu bot no Telegram, depois:
openclaw pairing list telegram
openclaw pairing approve telegram <CÓDIGO>
Pronto. Genuinamente o canal mais simples de configurar.
Como conectar o Discord?
O Discord exige criar uma aplicação de bot no portal de desenvolvedores.
Passo 1: Vai em discord.com/developers/applications e clica em New Application.
Passo 2: Na barra lateral, clica em Bot → Reset Token → copia o token.
Passo 3: Na página do Bot, desce e ativa Message Content Intent.
Passo 4: Vai em OAuth2 → URL Generator. Marca o scope bot, depois marca essas permissões: Send Messages, Read Message History, Add Reactions, Attach Files, Embed Links.
Passo 5: Copia a URL gerada, abre no browser e adiciona o bot ao seu servidor.
Passo 6 — Adiciona config:
{
  "channels": {
    "discord": {
      "enabled": true,
      "botToken": "seu-bot-token-aqui",
      "dmPolicy": "pairing"
    }
  }
}
Passo 7 — Reinicia e verifica:
openclaw daemon restart
openclaw channels status --probe
Dica: cria um servidor privado no Discord com canais dedicados por contexto — ex:#coding,#research. Mantém sessões diferentes de IA limpas e separadas.
Como conectar o Slack?
O Slack precisa tanto de um bot token quanto de um app token (pra socket mode).
Passo 1: Vai em api.slack.com/apps → Create New App → From scratch.
Passo 2: Em Socket Mode, ativa, depois clica pra gerar um App Token (começa com xapp-). Copia.
Passo 3: Em OAuth & Permissions, adiciona esses bot scopes: chat:write, channels:history, im:history, app_mention.
Passo 4: Clica em Install to Workspace e autoriza.
Passo 5: Copia o Bot User OAuth Token (começa com xoxb-).
Passo 6: Em Event Subscriptions, ativa eventos e assina: message.im, app_mention.
Passo 7 — Adiciona config:
{
  "channels": {
    "slack": {
      "enabled": true,
      "botToken": "xoxb-seu-bot-token",
      "appToken": "xapp-seu-app-token",
      "dmPolicy": "pairing"
    }
  }
}
Passo 8 — Reinicia:
openclaw daemon restart
openclaw channels status --probe
Como conectar o Lark / Feishu?
Passo 1: Vai pro console de desenvolvedor:
- Lark: open.larksuite.com
- Feishu: open.feishu.cn
Passo 2: Cria um Custom App e vai pra página de Credentials. Copia o App ID (começa com cli_) e o App Secret.
Passo 3 — Adiciona config:
{
  "channels": {
    "feishu": {
      "enabled": true,
      "domain": "lark",
      "accounts": {
        "main": {
          "appId": "cli_seu-app-id",
          "appSecret": "seu-app-secret"
        }
      }
    }
  }
}
Pro Feishu especificamente (vs. a versão internacional Lark), muda "domain" pra "feishu".
Passo 4 — Reinicia:
openclaw daemon restart
openclaw channels status --probe
Como conectar o iMessage? (Só macOS)
Esse exige uma ferramenta CLI helper e algumas permissões de privacidade do macOS. É a configuração de canal mais trabalhosa.
Passo 1 — Instala a ferramenta CLI:
brew install steipete/tap/imsgPasso 2 — Concede permissões:
- Abre Configurações do Sistema → Privacidade e Segurança → Acesso Total ao Disco
- Ativa pra seu aplicativo Terminal
- Quando solicitado, permite acesso de Automação pro Messages
Passo 3 — Adiciona config (substitui SEU_USUARIO pelo seu nome de usuário macOS real):
{
  "channels": {
    "imessage": {
      "enabled": true,
      "cliPath": "/usr/local/bin/imsg",
      "dbPath": "/Users/SEU_USUARIO/Library/Messages/chat.db"
    }
  }
}
Passo 4 — Reinicia:
openclaw daemon restartQuais são as opções de controle de acesso dos canais?
Todos os canais compartilham o mesmo sistema de controle de acesso. Aqui está o que cada configuração faz:
| Opção | Valores | Descrição |
|---|---|---|
| dmPolicy | pairing (default), allowlist, open, disabled | Quem pode fazer DM pro bot diretamente |
| groupPolicy | allowlist, mention, open, disabled | Como o bot se comporta em chats de grupo |
| allowFrom | Array de identificadores | Whitelist explícita de remetentes |
Pra uso pessoal, pairing é o default certo — significa que o bot exige uma aprovação antes de aceitar mensagens de um novo contato.
Se você está rodando isso num servidor compartilhado e quer bloquear ainda mais, usa allowlist com um array allowFrom explícito contendo só os identificadores em que você confia.
Como verificar que tudo funciona?
Depois de terminar a configuração, faz uma checagem rápida:
openclaw daemon restart
sleep 3
openclaw models list
Você deve ver os modelos do seu provider listados — algo como anthropic/claude-sonnet-4-6. Se a lista estiver vazia, quase sempre significa que a API key está errada. Volta pro console do seu provider e verifica se a key é válida e o billing está configurado.
Verifica os canais conectados:
openclaw channels status --probeEsse comando verifica cada canal ativo e te diz se a conexão está ao vivo.
Como começar a usar o OpenClaw?
Chat no terminal
openclaw tuiAbre uma interface interativa no terminal. Limpa, rápida, funciona bem pra workflows de desenvolvimento onde você já está no terminal.
Dashboard web
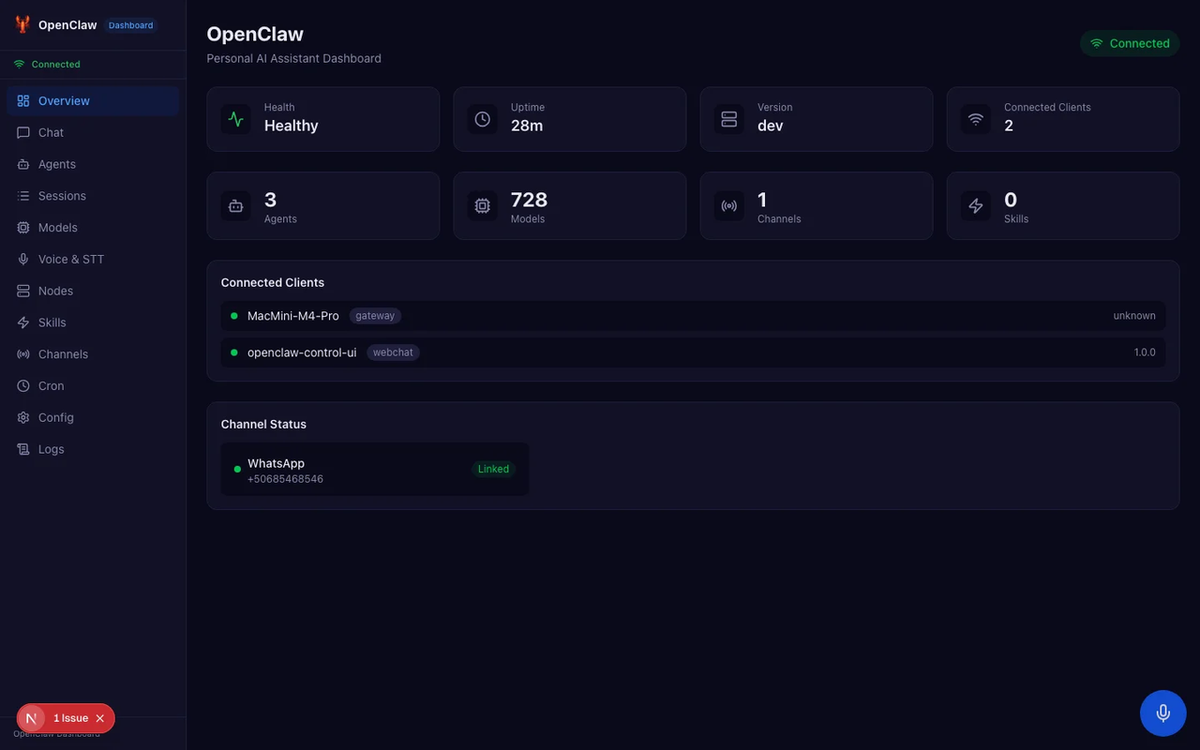
openclaw dashboardDepois abre http://127.0.0.1:18789 no browser. Melhor pra conversas mais longas ou quando você quer uma interface mais visual.
Comandos úteis
| Comando | O que faz |
|---|---|
| openclaw tui | Abre chat no terminal |
| openclaw dashboard | Abre dashboard web |
| openclaw daemon status | Verifica se o daemon está rodando |
| openclaw daemon restart | Reinicia o daemon |
| openclaw daemon logs | Vê logs do daemon (essencial pra debug) |
| openclaw models list | Lista modelos disponíveis |
| openclaw channels status --probe | Verifica status de conexão dos canais |
Exemplo de configuração completa
Aqui está um ~/.openclaw/openclaw.json completo mostrando Anthropic com WhatsApp e Telegram conectados — usa como referência pra construir sua própria config:
{
  "env": {
    "ANTHROPIC_API_KEY": "sk-ant-your-key-here"
  },
  "agents": {
    "defaults": {
      "model": { "primary": "anthropic/claude-sonnet-4-6" },
      "compaction": { "mode": "safeguard" },
      "maxConcurrent": 4,
      "subagents": { "maxConcurrent": 8 }
    }
  },
  "channels": {
    "whatsapp": {
      "enabled": true,
      "dmPolicy": "pairing",
      "allowFrom": ["+1234567890"]
    },
    "telegram": {
      "enabled": true,
      "botToken": "123456:ABC-your-bot-token",
      "dmPolicy": "pairing"
    }
  },
  "gateway": {
    "mode": "local",
    "bind": "loopback",
    "auth": { "mode": "token" },
    "nodes": {
      "denyCommands": [
        "camera.snap", "camera.clip", "screen.record",
        "calendar.add", "contacts.add", "reminders.add"
      ]
    }
  },
  "messages": { "ackReactionScope": "group-mentions" },
  "commands": { "native": "auto", "nativeSkills": "auto" },
  "skills": { "install": { "nodeManager": "npm" } }
}
O que fazer quando algo dá errado?
Aqui está o que eu realmente encontrei (e vi outros encontrarem):
| Problema | Causa mais provável | Solução |
|---|---|---|
| openclaw: command not found após instalação | npm global bin não está no PATH | export PATH="$(npm config get prefix)/bin:$PATH" — adiciona ao seu shell profile |
| node: command not found | Node.js não instalado | macOS: brew install node — ou baixa denodejs.org |
| openclaw.json não encontrado | Onboarding nunca foi concluído | Roda openclaw onboard --install-daemon |
| Lista de modelos está vazia | API key inválida ou billing não configurado | Verifica no console do seu provider; roda openclaw daemon logs pra detalhes de erro |
| Daemon não inicia | Porta 18789 já em uso, ou crash anterior | openclaw daemon stop && openclaw daemon start |
| QR code do WhatsApp expirou | Sessão expirou durante o scan | Roda novamente openclaw channels login --channel whatsapp |
| Canal não conecta | Erro de config (typo no token, nome de campo errado) | openclaw channels status --probe + openclaw daemon logs |
Workflow rápido de debug: quando algo não funciona, openclaw daemon logs é quase sempre o primeiro passo certo. Ele te dá a mensagem de erro real em vez da falha silenciosa que você vê nos comandos de status.
Links de referência rápida
- Docs do OpenClaw: docs.openclaw.ai
- GitHub do OpenClaw: github.com/openclaw/openclaw
- Console Anthropic (API Keys): console.anthropic.com
- Docs de modelos Anthropic: docs.anthropic.com/en/docs/about-claude/models
- Plataforma OpenAI: platform.openai.com
- OpenRouter: openrouter.ai
- Portal de desenvolvedores Discord: discord.com/developers/applications
- API Slack: api.slack.com/apps
- Lark Developer: open.larksuite.com
- Feishu Developer: open.feishu.cn
- Node.js (instalar): nodejs.org
- Configuração WSL2 (Windows): Documentação oficial Microsoft WSL2
FAQ: Perguntas sobre configuração do OpenClaw
P: Preciso manter meu terminal aberto pra o OpenClaw funcionar? Não. A flag --install-daemon no comando de onboarding configura um serviço em background que roda mesmo quando seu terminal está fechado. Esse é o objetivo do daemon.
P: Qual modelo de IA devo usar se não tiver certeza? Claude Sonnet 4.6 via Anthropic é o default seguro. É a melhor relação custo-capacidade pra tarefas de uso geral. Se você se encontrar atingindo seus limites em tarefas de raciocínio complexo, sobe pro Opus 4.6.
P: Posso usar múltiplos providers ao mesmo tempo? Sim — adiciona API keys pra múltiplos providers na sua config e alterna entre eles mudando o valor model.primary. O OpenRouter foi construído exatamente pra esse caso de uso se você quer uma única key que roteia entre providers.
P: Minha API key fica armazenada com segurança? Fica armazenada em ~/.openclaw/openclaw.json na sua máquina local. Esse arquivo só é legível pela sua conta de usuário (assumindo permissões padrão). Não commita no controle de versão — trata como qualquer outro arquivo de secrets.
P: O que acontece quando um model ID muda? O OpenClaw vai falhar ao rotear a requisição e registrar um erro. Quando isso acontecer, verifica a documentação do provider pro model ID atual e atualiza sua config. É por isso que adicionei uma nota sobre IDs de modelo serem sensíveis à versão — vale favoritar a página de modelos da Anthropic e verificar se as coisas pararem de funcionar depois de uma atualização do provider.
P: Posso rodar o OpenClaw num servidor remoto e acessar de qualquer lugar? Tecnicamente sim, mas não expõe o gateway pra internet pública sem entender o que está fazendo. A seção de segurança cobre o baseline — se você precisa de acesso remoto, considera SSH tunneling em vez de mudar o endereço de bind pra 0.0.0.0.
P: O daemon continua crashando. O que devo verificar? Roda openclaw daemon logs e procura o erro real. Causas comuns: JSON de config inválido (vírgula faltando, colchete extra), conflito de porta 18789, ou uma API key que foi revogada.
Lucas: O ponto que mais pegou gente no lançamento foi o PATH depois da instalação global. Se openclaw não é encontrado, vai direto pra seção "O que fazer quando algo dá errado" — economiza meia hora de debug.Sobre o autor: Lucas Mendonça é dev full-stack freelancer com experiência em construir MVPs e ferramentas internas pra startups. Escreve sobre uso prático de IA no dia a dia do dev — o que funciona de verdade quando o deadline está chegando.
