By the end of this tutorial you'll have DeepSeek-TUI running against a live DeepSeek V4 model, understand why two binaries are required and what breaks if one is missing, and have completed at least one Plan, Agent, and YOLO session. Twenty minutes if you already have Rust installed. Thirty to forty if you're installing Rust first.
One thing to set expectations correctly: DeepSeek-TUI ships as two required binaries. Most install friction comes from not knowing this upfront. The tutorial addresses it directly.
What You'll Have Working by the End
- DeepSeek-TUI running with a live V4 model (Pro or Flash, your choice)
- A complete Plan session exploring a repo without writing any files
- An Agent session with tool-call approval gates
- A YOLO session with auto-approve (and a clear understanding of when not to use it)
- At least one skill installed and one MCP server validated
Prerequisites
Rust 1.85+ (for Cargo path) or Node.js 18+ (for npm path)
Check your Rust version:
rustc --version
# Need: rustc 1.85.0 or later
# If missing or old: curl --proto '=https' --tlsv1.2 -sSf https://sh.rustup.rs | sh
If you prefer npm over compiling from source, Node.js 18+ is sufficient. The npm package downloads prebuilt binaries from GitHub Releases — you won't be compiling anything.
DeepSeek API key
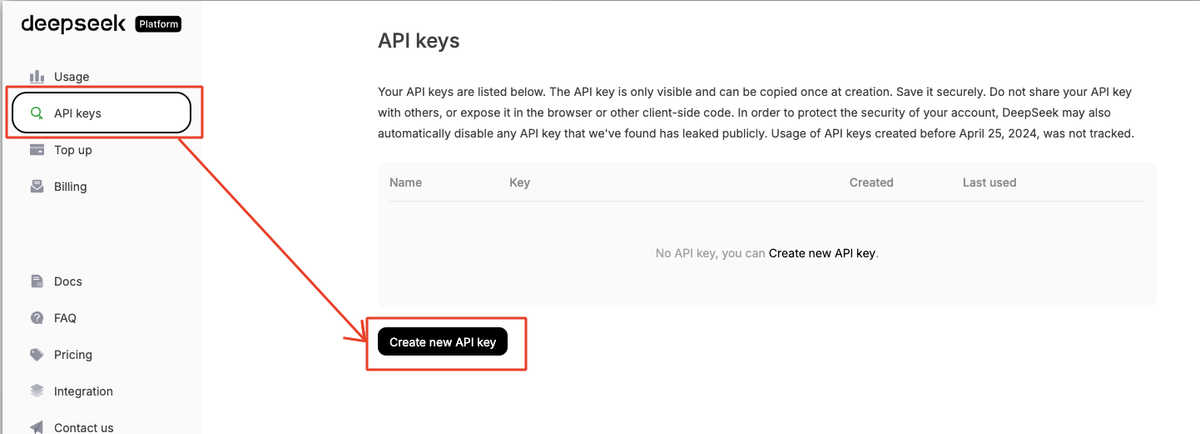
Sign up at platform.deepseek.com, add credit, and copy your API key. The minimum deposit is $5. Keep the key ready — you'll set it in the auth step.
Alternatives if you're not using DeepSeek's API directly: NVIDIA NIM and Fireworks AI both host DeepSeek V4. For self-hosted, SGLang works. Provider setup is covered in the Pick a Provider section.
Terminal notes
macOS/Linux: Any modern terminal works. The TUI takes over the full screen in alternate-screen mode.
WSL: Supported. Use a terminal that handles alternate-screen mode cleanly (Windows Terminal works well; older ConEmu variants may have rendering issues).
PowerShell/Windows native: Supported as of v0.8.8. Path separator handling and binary naming use Windows conventions. Install via Scoop (scoop install deepseek-tui) or download prebuilt binaries directly.
Install Path A — Cargo (Both Crates Required)
This is the source-compilation path. It takes longer but produces binaries optimized for your exact platform.
# Step 1: install the dispatcher (provides the `deepseek` command)
cargo install deepseek-tui-cli --locked

# Step 2: install the runtime (provides the `deepseek-tui` command)
cargo install deepseek-tui --locked

# Verify both are on your PATH:
deepseek --version
deepseek-tui --version
Do not skip --locked****. It pins dependency versions to the lockfile. Without it, Cargo may pull incompatible transitive dependencies that compile but misbehave at runtime.
Why both binaries are needed (MISSING_COMPANION_BINARY explained)
deepseek (from deepseek-tui-cli) is the dispatcher: it handles auth, config, model selection, and then delegates to deepseek-tui for the actual agent runtime and TUI. If you run deepseek without deepseek-tui present on PATH, you get:
Error: MISSING_COMPANION_BINARY
The `deepseek-tui` binary was not found. Both binaries must be installed.
See https://github.com/Hmbown/DeepSeek-TUI for installation instructions.
Installing only deepseek-tui without the dispatcher produces the reverse — you can launch the TUI binary directly but lose the clean entrypoint, auth management, and config forwarding. Install both.
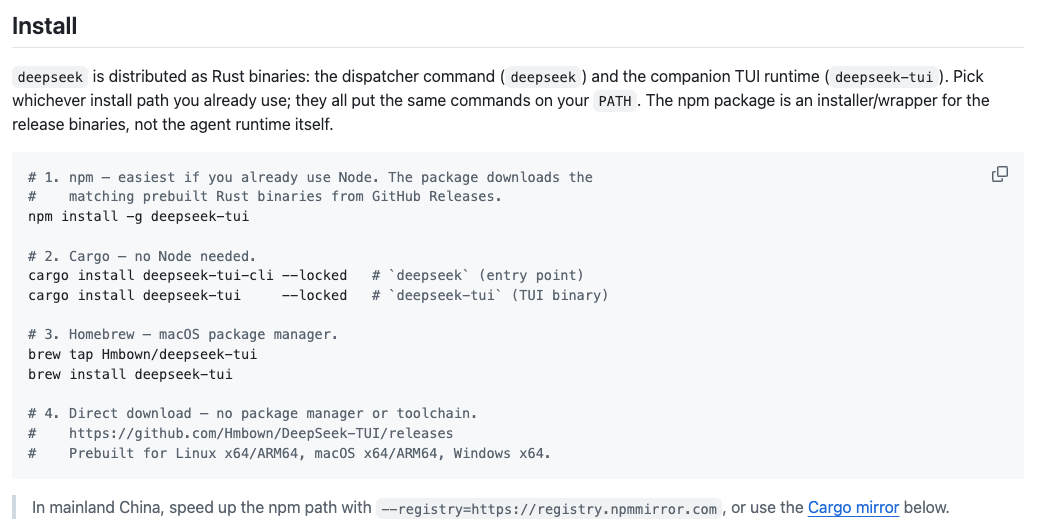
Install Path B — npm Wrapper
The npm path downloads prebuilt Rust binaries from GitHub Releases. No compilation. Requires Node.js 18+ at install time, but not at runtime — the binaries are native executables.
npm install -g deepseek-tuiThe postinstall script downloads the correct pair of binaries for your platform, verifies a SHA-256 manifest, and places both deepseek and deepseek-tui on your PATH.
When npm is preferable
- You don't have Rust installed and don't want to install it
- You're on a machine where compilation is slow or restricted
- You want the quickest path to a working installation
China mainland note: Add the registry mirror to avoid slow downloads:
npm install -g deepseek-tui --registry=https://registry.npmmirror.comInstall Path C — Prebuilt Binaries
Download directly from GitHub Releases. Both the deepseek and deepseek-tui binaries must be downloaded for your platform and placed in the same directory on PATH.
Available platforms: Linux x64, Linux ARM64, macOS x64, macOS ARM64 (Apple Silicon), Windows x64.
SHA-256 verification
# Download the manifest alongside your binaries:
curl -L -o /tmp/deepseek-artifacts-sha256.txt \
  https://github.com/Hmbown/DeepSeek-TUI/releases/latest/download/deepseek-artifacts-sha256.txt

# Linux:
( cd ~/.local/bin && sha256sum -c /tmp/deepseek-artifacts-sha256.txt --ignore-missing )

# macOS:
( cd ~/.local/bin && shasum -a 256 -c /tmp/deepseek-artifacts-sha256.txt --ignore-missing )
Mirror URL (DEEPSEEK_TUI_RELEASE_BASE_URL)
If GitHub Releases is slow from your network:
export DEEPSEEK_TUI_RELEASE_BASE_URL=https://your-mirror.example.com/releases
npm install -g deepseek-tui   # npm downloader respects this env var
First-Run Authentication
# Set your DeepSeek API key:
deepseek auth set --provider deepseek --api-key "YOUR_DEEPSEEK_API_KEY"

# Verify it's stored:
deepseek auth status
Where the config lives
~/.deepseek/config.tomlThe config file is shared between the dispatcher and the TUI runtime. deepseek login --api-key ... writes to the api_key field that deepseek-tui reads directly.
Environment-variable alternative
If you prefer not to write credentials to disk:
export DEEPSEEK_API_KEY="your-api-key"
deepseek   # picks up the env var automatically
For CI/CD pipelines or Docker environments, env var injection is the correct approach. The config file path is user-home-based and doesn't exist by default in containerized contexts.
Pick a Provider
Direct DeepSeek (default)
deepseek auth set --provider deepseek --api-key "YOUR_KEY"
deepseek   # uses api.deepseek.com by default
NVIDIA NIM
deepseek auth set --provider nvidia-nim --api-key "YOUR_NVIDIA_KEY"
deepseek --provider nvidia-nim
NIM requires a specific base URL in some configurations. See docs/CONFIGURATION.md in the repo for NIM-specific settings.
Fireworks AI
deepseek auth set --provider fireworks --api-key "YOUR_FIREWORKS_KEY"
deepseek --provider fireworks --model accounts/fireworks/models/deepseek-v4-pro
Self-hosted SGLang
# SGLang runs locally — no API key needed by default
deepseek --provider sglang   # assumes localhost:30000/v1
For a custom SGLang base URL, set it in ~/.deepseek/config.toml under [profiles.sglang].
Pick a Model — V4-Pro vs V4-Flash
deepseek --model deepseek-v4-pro     # flagship, higher cost, deeper reasoning
deepseek --model deepseek-v4-flash   # faster, cheaper, lighter reasoning
You can also set the default in config:
# ~/.deepseek/config.toml
default_text_model = "deepseek-v4-flash"
When to default to which
Use V4-Flash as the default for:
- Exploratory sessions where you're figuring out what to ask
- High-volume agentic loops where cost per run matters
- RLM sub-agent children (Flash is the RLM default and is intentional)
Switch to V4-Pro for:
- Complex multi-file refactors where reasoning depth matters
- Tasks that have failed on Flash with wrong assumptions
- Architecture and design sessions where thoroughness outweighs cost
Run Your First Session in Each Mode
Plan mode — exploring a repo without writing
Plan mode restricts the agent to read operations. No file writes, no shell execution. Use it to understand what the agent would do before it does anything.
deepseek plan "Explain the structure of this repo and identify the main entry points"Or start the TUI and switch inside the session:
deepseek   # open the TUI
# then press: Shift+Tab to toggle Plan mode
In Plan mode, the agent reads files, searches the codebase, and returns a structured analysis. Nothing changes in your working tree. Use this as a first pass before committing to an Agent run.
Agent mode — default loop with approvals
Agent mode is the default. Every tool call that modifies state requires your explicit approval.
deepseek # opens in Agent mode by defaultInside the TUI, you'll see each proposed tool call before it runs:
┌─ Tool Call ───────────────────────────────────┐
│ bash: git diff HEAD~1 --stat                  │
│ [A]pprove  [S]kip  [E]dit  [Q]uit             │
└───────────────────────────────────────────────┘
A minimal first session:
> Read the README and summarize the project's purpose in three sentencesThe agent will call read_file on the README. You'll see the approval prompt. Press A to approve. The agent responds with its summary. No files are written.
YOLO mode — when (and when not) to use it
YOLO mode auto-approves all tool calls without prompts.
deepseek --yolo # launch in YOLO modeOr toggle inside a session (keyboard shortcut varies by version — check the footer keybindings in the TUI).
When YOLO is appropriate: Trusted workspaces where you've already reviewed the task scope, the agent is running a well-defined task you've seen work before, and you want uninterrupted execution.
When YOLO is not appropriate: Any task involving git commits, file deletions, network requests, or shell commands with side effects you haven't reviewed. YOLO skips the approval gate entirely — if the agent decides to rm -rf something or push a commit, it will. A v0.8.8 bug fix specifically addressed YOLO auto-approving git -C ... without workspace trust checks; this class of bug is worth keeping in mind when running in YOLO mode on unfamiliar tasks.
Add Skills and MCP Servers
Install a community skill
# Install from GitHub (no backend service required):
/skill install github:owner/repo-name

# List installed skills:
/skills

# Activate a skill for the current session:
/skill my-skill-name
DeepSeek-TUI also discovers skills automatically from workspace directories. If you have a .claude/skills/ directory from Claude Code usage, it will find those skill files too.
Set up an MCP server
# Initialize MCP directory structure:
deepseek-tui mcp init

# Validate an MCP server connection:
/mcp validate
MCP servers are configured in ~/.deepseek/config.toml under [mcp.servers]. After adding a server entry, restart the TUI and run /mcp validate to confirm the connection.
Common Errors and Fixes
MISSING_COMPANION_BINARY
Error: MISSING_COMPANION_BINARYFix: Install the missing binary. If deepseek is installed but not deepseek-tui:
cargo install deepseek-tui --locked
# or: npm install -g deepseek-tui  (reinstalls both)
Both binaries must be in the same directory or both on PATH. Installing via npm handles this automatically; Cargo installs to ~/.cargo/bin/ by default, so both end up in the right place.
aarch64 / arm64 mismatch on older versions
If you're on Linux ARM64 and see Unsupported architecture: arm64 from the npm installer:
Error: Unsupported architecture: arm64This affects v0.8.7 and earlier, which did not publish Linux ARM64 prebuilt binaries. Fix: Update to v0.8.8 or later (which publishes both deepseek-linux-arm64 and deepseek-tui-linux-arm64), or build from source:
git clone https://github.com/Hmbown/DeepSeek-TUI.git
cd DeepSeek-TUI
cargo install --path crates/cli --locked
cargo install --path crates/tui --locked
Note: confirm against the current CHANGELOG — this caveat is accurate as of v0.8.8; newer releases may extend prebuilt coverage.
API key not picked up in subshells
If you set DEEPSEEK_API_KEY in your shell and it's not recognized when the TUI launches:
# Check if the var is exported (not just set):
echo $DEEPSEEK_API_KEY

# If empty, export it properly:
export DEEPSEEK_API_KEY="your-key"

# Or use the auth command to write it to config (persists across sessions):
deepseek auth set --provider deepseek --api-key "your-key"
The config file approach is more reliable across terminal sessions, shells, and editors that launch their own subprocesses.
Self-updater arch-name bug (v0.8.x caveat)

The self-updater in versions around v0.8.7 used raw Rust architecture constants (aarch64, x86_64) instead of the release asset naming convention (arm64, x64). This caused self-update to fail with a "binary not found" error on ARM64 systems. The fix shipped in v0.8.8 (update.rs now uses release asset naming).
If deepseek update fails with an asset resolution error, update manually by re-running your original install command or downloading from GitHub Releases directly.
FAQ
Do I really need both deepseek and deepseek-tui binaries?
Yes. They're not interchangeable. deepseek is the dispatcher (auth, config, model selection) and deepseek-tui is the runtime (TUI rendering, agent loop, tool execution). The dispatcher explicitly delegates to the runtime; running either alone fails at startup.
Can I point it at OpenAI or Anthropic instead?
No. The supported providers — DeepSeek direct, NVIDIA NIM, Fireworks, SGLang — all serve DeepSeek models. The tool is not a generic OpenAI-compatible wrapper. If you want Claude or GPT-5.5 as the backend, use Claude Code or a model-agnostic agent instead.
How do I switch models mid-session?
Via the deepseek --model flag at launch, or by restarting with a different model. The TUI does not currently expose a /model slash command to switch the active model mid-session without restarting. Use V4-Flash as the default and relaunch with --model deepseek-v4-pro when a task needs deeper reasoning.
Where are sessions and snapshots stored?
~/.deepseek/sessions/     # session metadata and transcripts
~/.deepseek/state/        # runtime state, including checkpoints
~/.deepseek/memory/       # project memory (survives context resets)
To resume a previous session, use deepseek-tui resume. To fork a session from a snapshot, use deepseek-tui fork.
Does it work inside VS Code's integrated terminal?
Yes, with caveats. The alternate-screen TUI renders correctly in VS Code's integrated terminal on macOS and Linux. Windows via VS Code integrated terminal works but may have scroll capture conflicts — if the TUI captures mouse input by default (tui.mouse_capture = true) and you want to use VS Code's terminal scrollback, disable it:
# ~/.deepseek/config.toml
[tui]
mouse_capture = false
Or pass --no-mouse-capture at launch.
Related Reading
